Sunday, June 28, 2009

Shortcake Drop Biscuits!

I just made strawberry shortcake with our farmer's market strawberries. Does any dessert say summer like strawberry shortcake? Reminds me of summers as a kid when Mom would make the best strawberry shortcake ever, often with strawberries from our very own garden. Mom used the Bisquick recipe though, and I've long since stopped buy Bisquick. So I altered a regular biscuit recipe to come up with this!

Shortcake Drop Biscuits for Strawberry Shortcake
3 c flour
4 t baking powder
heaping 1/2 t salt
5-6 T sugar
3/4 c butter
1 c milk of your choice
Mix flour, powder, salt and sugar together. Cut in butter with pastry blender. Make a well in the flour mixture, add milk all at once. Stir with fork until just moistened. Drop by spoonfuls (or forkfuls) onto greased baking sheet. Bake at 450 degrees for 10 minutes or until toothpick comes out clean. Makes 10-12 biscuits. Top with sweetened strawberries and their syrup and whipped cream or vanilla ice cream.

Sadly we had no whipped cream or ice cream tonight, but these were still delicious! And if you run out of strawberries just drizzle some honey on top. Sooooo good!

Saturday, June 27, 2009

Strawberry Spinach Salad

This recipe is from my cousin Elaine and it's always been a big hit so I thought I'd give it a shot for a reunion we have going on today.

For Salad:
1 lb fresh spinach (2-10 oz bags)
1 pint strawberries slice
1/2 cup coarsely chopped pecans (I like sliced almonds)

For Dressing:
1 cup canola oil
1/2 cup sugar
1/3 cup red wine vinegar
1/4 tsp salt
1 tsp poppy seed
1 tsp dry mustard
1 tsp powdered onion

To prepare:
Combine all dressing ingredients EXCEPT poppy in a blend until thickened slightly. Add poppy. Just before serving, pour dressing over the mixture of spinach, strawberries, and pecans.

***My [her] personal preference is to pour the dressing over the salad at least an hour before and let it soak in. This really doesn't serve too well the next day after sitting in the dressing and this is a very big recipe. Don't make more than you can eat the same day.***

Tuesday, June 23, 2009

Copy That! - Olive Garden Salad

This salad is so good!

I now live in a place where there are no Olive Gardens (I know, hard to believe)
, and my favorite part of going there was the salad. So I was very excited when I saw this recipe in the newest Food Network magazine (June/July 2009). My husband and I both really liked the homemade version, but he thought it tasted like the real deal, and I thought it was so close but something was missing. Either way, it's a great summer salad!

Serves 4.

Ingredients

For the dressing:

  • 1/4 cup extra-virgin olive oil
  • 2 tablespoons white wine vinegar
  • 3 tablespoons Miracle Whip
  • 1 tablespoon lemon juice
  • 2 tablespoons grated parmesan cheese
  • 1/4 teaspoon garlic salt
  • 1/2 teaspoon dried Italian seasoning

For the salad:

  • 1 10-ounce bag American salad blend (I actually just used Romaine)
  • 1/4 red onion, thinly sliced
  • 4 small pickled peppers, such as pepperoncini (I used sliced,mild banana peppers, chopped)
  • 1 small vine-ripened tomato, quartered
  • 2 tablespoons sliced black olives (I used about 10 whole black olives, but I REALLY like black olives)
  • 1/2 cup large croutons
  • 1 tablespoon grated parmesan cheese

Directions

Combine all the dressing ingredients and 1 to 2 tablespoons water in a blender or food processor; puree until smooth.

Place the salad blend in a large bowl and top with the remaining salad ingredients. Drizzle with the dressing, and toss.

Monday, June 22, 2009

The Smart Shopper

If you've ever ran back and forth across the grocery store because your list isn't in any order (like I used to), then you NEED this. It's the smart shopper. I got this as a birthday gift from my husband, and loved it, so I figured I would share it with you. It may sound like a boring gift, but I asked for it for Christmas and didn't get it, so I was very excited when I opened it!

You speak into it what you want to add to your list. You can even change the amount, like 5 apples and 1/2 lb. ground beef. It categorizes your list and you print it off. You can even add items that aren't already programed into it, which it comes with 2500 items pre-programed. You can also put errands on your list as well, like going to the dentist, get gas, etc. You can mount it to your kitchen wall or it's magnetic, so just hang it on your refrigerator!


Here it is!

And Voila! You have your shopping list.

It really makes my grocery shopping experience a lot easier and faster.

Thursday, June 11, 2009

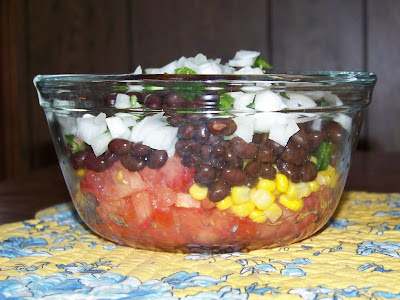
Pretty Salsa

I like my salsa chucked full of goodies. It makes it look pretty too!

Ingredients:
3 small to medium tomatoes - chopped
1 can black beans - rinsed and drained
1/2 can corn - drained
1 jalapeno pepper - seeded and chopped
1 small red onion - chopped (I didn't have red so I used a sweet onion)
1 to 2 tsp Cumin
1/4 cup lime juice

Mix all together and enjoy.


Tiramisu

The Italians are geniuses! They figured out a way to have their dessert, coffee and nightcap all on one plate; and it's delicious! Most of you don't know me, but I am Italian, my last name is not, but my grandmothers maiden name is Galardi, okay..... :)

I love, love, love this recipe!! I only really make it a couple times a year, but I should make it more often. It's great for company or a crowd. I know most Tiramisu recipes have raw egg in it, but this one does not. It can also be halved very easily, I just never have. Enjoy!!


Servings: 12-15 servings
Source: adapted from "Young and Hungry" by David Lieberman

Ingredients
1 cup heavy cream
1 pound (16 oz.) mascarpone cheese
1 teaspoon vanilla extract
1 cup superfine sugar
3-4 cups very strong brewed coffee, cooled
2 packages of ladyfingers (it's about 48 to 50 ladyfingers)
3-5 tablespoons white rum
cinnamon
unsweetened cocoa powder

Directions
  1. Beat the heavy cream, mascarpone, vanilla extract, and sugar in a mixing bowl with an electric mixer until mixture holds soft peaks.
  2. Dip ladyfingers in the coffee for a second or two, just enough to moisten them, but not enough to soak them. Line the bottom of a 9 by 13-inch pan with them.
  3. Using a pastry brush, dab each ladyfinger with some rum.
  4. Spoon half of the mascarpone mixture on top of the ladyfingers and smooth out in a even layer.
  5. Sprinkle with cinnamon and a generous layer of cocoa powder.
  6. Make another layer of ladyfingers, dab them with rum. Spoon the rest of the mascarpone mixture over the ladyfingers and sprinkle with cinnamon and cocoa powder.
  7. Make up to a day in advance (but at least 4 hours) and keep in the fridge.
  8. Serve cold right from the pan.

Saturday, June 6, 2009

Lemon-Thyme Cornmeal Quick Bread

My sister-in-law evidently is addicted to participating in online surveys, and for doing them she often gets magazine subscriptions, so she and her sister and I are all signed up for the same magazines. One of them is Cooking Light. This is a recipe from the June 2009 issue.

1/3 cup all-purpose flour
1 cup yellow cornmeal (the recommend not using stone-ground because it is too coarse)
1 tsp baking powder
3/4 tsp kosher salt
3/4 cup egg substitute (I think that's gross; I used 3 eggs)
2/3 cup sugar
1/3 cup plus 2 T canola oil
1 T fresh thyme
1 T grated lemon rind (I omitted this)
2 T lemon juice
2 T pine nuts (I omitted them)
1 T butter, melted

Combine flour, cornmeal, baking powder, and salt in a medium bowl, mix it up, set aside.

In an electric mixer, beat eggs, sugar and oil until well blended. Add thyme, rind and juice; beat until well combined. Add flour mixture; beat until just combined. Chop 1 T of nuts, stir into the batter.

Grease a loaf pan and pour in batter. Sprinkle top with remaining pine nuts. Bake at 325 for 30 minutes. Remove pan and drizzle melted butter over batter. Return to oven for 20 more minutes, or until it looks right.

It was great! I'm not sure if it's supposed to be this way, but all of my kosher salt seemed to sink to the bottom. So the top of the loaf was butter (delicious), the middle of the loaf was sweet and lemony with a hint of savory thyme (delicious), and the bottom of the loaf was salty (delicious.) It was so good! And quick and easy, which of course makes it extra awesome. The only downside is that the cornmeal consistency gets stuck in your teeth! Yikes!

Cowboy Beans

Martin learned about this style of beans from a janitor at Central Catholic.

-1 can (or however many cans you want) baked beans
-1/2lb (or however much you want) ground beef
-a good sprinkling of any spices you desire--I use Tony Chachere's cajun spice

Cook up the ground beef in a big pan, add the beans, add the spices, stir until hot. You could probably add onions as well, and probably jalepenos too. I've never tried either, but they seem like they might fit, I dunno.

Today we made a HUGE pan of this, and it was our lunch! And it filled us up so much, we didn't feel like eating dinner!

Friday, June 5, 2009

Small & Simple Discoveries

I recently discovered some things in the kitchen that everyone else probably already knows about. But just in case and so I don't forget and because this blog is all about food:

My mom put together this simple non-lettuce salad for me last summer when she was here, helping us get settled. It is so good, easy and nutrious:
Cut up one cucumber. Thinly slice some onion, just a bit for the flavor. Chop half a red pepper. Combine in a bowl. Drizzle with just enough olive oil to coat and squeeze half a lemon over veggies. Add some salt and pepper if you want. Yummy. I also substitute tomato for the red peppers when they're not on sale because those things are expensive.

I also realized recently how changing one part of a meal can spice things up considerably. For example having a regular sandwich at lunch time but using pita bread instead of regular bread is exciting enough to pretend that I'm eating out. I usually buy two loaves of bread at my biweekly shopping trip but for the summer months I think I'll buy one loaf and then a different bread item for sandwiches: pita bread, bagels, croissants. All those are breads that I usually only get when I go out to eat! What kind of bread do you use for sandwiches?

Monday, June 1, 2009

Grilled Chicken and Red Onion Quesadillas

Here's just a heads up for everyone: My husband LOVES to grill. We tend to grill out about 2 or 3 times a week during the summer, so I may be posting a lot of grilling and side recipes this summer season. :)

I think I may have found my favorite chicken marinade with this recipe. As I said in an earlier post, I am loving cilantro more and more. I know it's an odd flavor and it's not for everyone, but if you like it, you'll love this. There is a jalapeno in the marinade as well; and since it was my first time making this recipe, I seeded it. In doing that, it wasn't spicy and we just got the flavor of the pepper.


Marinating time:
3 to 4 hours
Grilling time: 20 to 25 minutes

Ingredients

For the Paste:
2 large garlic cloves
1 jalapeno chile pepper, stem removed
1 cup tightly packed fresh cilantro leaves
3 tablespoons extra virgin olive oil
2 tablespoons sherry vinegar (I used red wine vinegar)
1 teaspoon kosher salt
1/2 teaspoon dried oregano
1/2 teaspoon freshly ground black pepper


3 boneless, skinless chicken breast, about 8 oz. each, halved
1 large red onion, cut crosswise into 1/2-inch slices
extra virgin olive oil
4 cups grated Monterey Jack cheese (I used a Colby and Monterey Jack blend)
6 flour tortillas (10 inches)
tomato salsa

Directions
  1. To make the paste: In the food processor, mince the garlic and jalapeno. Add the remaining paste ingredients and process until smooth. Coat the chicken breasts on all sides with the paste and refrigerate for 3 to 4 hours.
  2. Lightly brush or spray the onion slices with oil. Grill the chicken and onions over direct medium heat until the chicken in opaque in the center and the onions are tender, 8 to 12 minutes, turning once. Remove the chicken and onions from the grill and allow to cool. Cut the chicken crosswise into 1/8-inch slices and onions into 1/4-inch pieces.
  3. Evenly divide the chicken, onions, and cheese over half of each tortilla. Fold the empty half of each tortilla over the filling, creating a half circle, and press down firmly. Grill the quesadillas over direct medium heat until well marked and the cheese has melted, 4 to 6 minutes, turning carefully once. Allow the quesadillas to cook for a minute or 2 before cutting into wedges. Serve with salsa.
Makes 6 servings
Source: Weber's Real Grilling